At the moment, many girls decorate their hair - they liven up their hairstyle with beautiful hairpins. Today, women buy in the store a suitable hairpin, which, however, is often disposable and short-lived - it quickly breaks. However, the girl should not despair - in such a situation, she can make her own hair clips with her own hands.

Materials: ribbons, elastic bands, beads, beads, polymer clay, organza, natural hair.
In order to independently make a beautiful hairpin at home, a girl buys such material as the basis for the hairpin - in the salon for needlework. In addition to the basics, a woman buys a earring hook in her store, a clasp for beads and a bracelet, etc.
In order to make their own hairpins-hairpins with their own hands, the girl uses these purchased materials:

Making a simple hairpin hair with their own hands: the wedding option
A modern, fitting ornament for women's headwear is an artificial flower. In order to fasten it on her hair, the girl makes a beautiful hairpin from a flower.
A woman buys an artificial bugle flower at a wedding store or in a needlework salon. With such a flower, girls decorate not only their hair, but children's dresses for girls.

However, the girl quickly grows - and then the flower from the dress can be transferred to the hairpin. In this situation, the woman detaches from the child's dress and glue the gun on the base of the hairpin.
At the same time, the barrette should cool down, and polyethylene - to harden, so that artificial flowers do not fall off.
To revive the resulting composition, the woman performs the following actions:

Making original artificial flowers at home: do-it-yourself Kanzashi hairpins
If a girl wants to make her image original, she does not buy flowers for a hairpin, but makes them herself.
In this situation, the woman uses a specific technique - "Kanzashi", when applied, the girl creates interesting flowers.
Each flower petal a woman makes separately, and then from them creates the necessary decoration. As a result, self-production of a flower is considered to be a difficult and lengthy handicraft exercise. But the result is above all praise!
When making an artificial flower, the girl performs the following actions:

Today, the girl makes at home a large number of similar petals, each of which has its own multi-colored ribbon. As a result, the girl obtained burgundy large petals, and small - orange.
After making the petal woman carefully examines it. If the gluing line is not durable, then the girl wraps it with a thin thread.
Then, the woman puts the smallest petal into a large petal and ties them - with a thread or with polyethylene glue - into one design.
The remaining petals are collected by a woman in a daisy or a multi-tiered flower. The main thing in this business is to fasten the petals with a thread and glue them with polyethylene.
When gluing petals with hot glue, it is necessary to avoid glue stains on similar products. Otherwise, the female barrette will look ugly and sloppy.
When decorating the center of the flower, the girl uses an old button or a bright yellow, red, burgundy bead. Also in this situation, you can use a blue bead or a sapphire button.
What do hairpins do?
For the manufacture of such accessories the following materials are used:
- fabrics (velvet, satin),
- variegated beads and intricate beads,
- colorful ribbons and laces,
- tree,
- plastic,
- metal fittings,
- thread,
- artificial or semi-precious stones.
It is also necessary to purchase a base - a metal clip, the size of which will depend on the preferences and tastes of the skilled worker. How to make a hairpin from the hair, using materials that are available, with your own hands?
Hairpins for girls
Each mother wants her baby to always look beautiful and attractive, so that the daughter is the most charming on holidays, and has a hairpin in her hair that perfectly fits her dress.
In order to make hair clips for girls, you must have the following materials:
- various fabrics: organza, atlas, guipure, chintz (which is recommended to starch),
- cardboard flower patterns,
- beads laces etc.
You can also interest the girl and offer crochet hairpins, which will be an interesting occupation for both mother and daughter.
Stages of creating felt pins
Instructions for making a chameleon hairpin:
- Before starting work, it is necessary to prepare tools and materials:
- automatic clamp,
- multicolored felt
- silicone glue or moment glue,
- scissors,
- thread,
- needles
- coins,
- pencil.

Tools and materials for hairpin-chameleon
- Put on the felt five coins of the same size and circle them around the contour with a pencil, sharpening the corners in the form of flower petals.
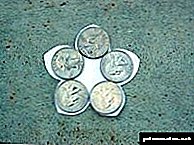
- Using smaller coins, cut out the middle of the flower in the form of circles.

Petals and middle of the future barrette
- Bend the flower in half, put another bent flower on top, and then all the others in the same way.

- Sew all the petals together and connect with the help of threads small circles of light shade in the center of the resulting flower.

- On the reverse side, you must sew a metal clip.
- The result is original and beautiful hairpins, which are suitable for any outfit of both a little girl and a teenager girl.

Photo of the chameleon hairpin
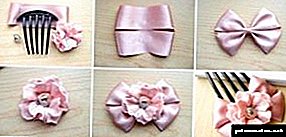
Stages of creating an atlas ornament
Hair clips for little ladies can also be made from a piece of satin or a beautiful ribbon.
For this you need:
- Attach the satin ribbon assembled onto the base of the metal clip.
Tip: A piece of satin ribbon must be of such a length that when assembling the base is closed with a ribbon completely.
- Attach large beads or fluff in a contrasting shade to the middle of each wave of the ribbon using silicone hot glue.
- When all the decorative elements are attached, you can sprinkle the edges of the ribbon with sequins and sprinkle with hair styling varnish or simply burn it with fire.
Tip! You can make a satin ribbon hairpin in the form of several elements that are fixed in one line, which will make it possible to close the metal base of the clip.

Satin Ribbon Decoration
Hairpins
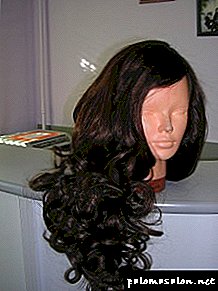
Hairpins from hair (comprehension) are an original and stylish accessory, as such jewelry always looks spectacular and elegant. Such products are made from both artificial and natural strands. Particularly impressive are the hairpins on the hair for a wedding, made in such a technique.
A little information
Young children are happy to make beautiful hair clips with their own hands. This is a great way to stand out, because you will not find such products anywhere else. There are many ideas and ways to make pins. Simplify the task of modern materials, which are presented in stores in a wide range.

Types of hairpins for hair can be different. Atlas, velvet, light chiffon, crepe-satin are suitable for the creative process. A twister for a hairstyle or bun should be made of dense soft material. It is interesting to look fabrics with prints: flowers, figurines. It is necessary to choose the thread to match the product, otherwise the design will not look beautiful. You can buy ready-made ribbons in the fabric salon. It is easier to work with them: they are already processed at the edges.
Also useful basis. It is better to take the metal remaining from old products.
With the help of a special glue, the decoration itself will be applied to it. Design and stealth from invisible. You can even use regular studs.

Children's hairpins of ribbons - the fastest way to stand out and give the image a charm. You will need:
- tape 5 cm wide one color,
- tape 2.5 cm wide of another shade
- threads, needles,
- bead,
- base machine,
- Moment glue.
Now you can proceed to the process itself.

Instruction
- The tape of the basic shade needs to be cut into pieces 7 cm long.
- Now each made strip needs to be folded at an angle of 90 degrees. The distance from the corner to the edges should be the same.
- It turns out a petal that should be strung on a thread with a needle.
- Thus, you need to make 4 more similar petals.


To do this, you need to sew or solder. The tip must be sharp, then the petal itself will be beautiful. Such parts need to do 6 pcs. Then they are sewn in a composition of 3 petals.
The hairpin is made of satin ribbons for the hairstyle. Now it can be safely worn. There is another option.
From scrap materials
You can make beautiful invisible haircuts or bun with the help of available tools that are always available in any home. In this way, even bumpits can be made. Below are some popular and unusual options.
- The remaining piece of lace can be used and unusual products can be made of it - bright hairpins for a hairstyle. It is necessary to cut a ribbon out of lace (you can buy it in the store too) and put it in the middle. Get a blank. From above you can sew a velvet circle of smaller diameter. In the middle of it is placed a bead, rhinestones or a button. Then you should take the basis for the invisible and glue the resulting flower on it.

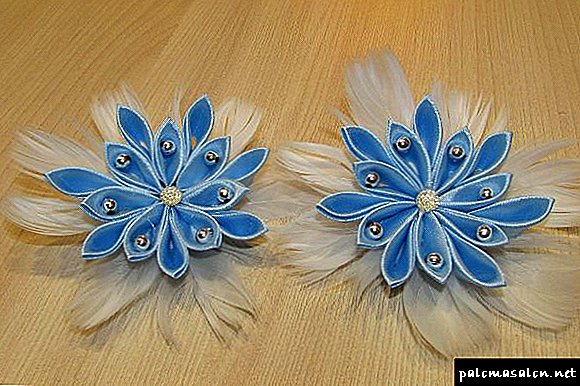
- In the handicraft shops it is sometimes possible to find beautiful feathers that adorn dance costumes. Too large should not be taken, but small ones will become an excellent component of a beautiful invisible being. You need to prepare a cardboard base, then carefully stick the feathers on it, and in the middle to place a bright shiny bead. This hairpin can be used for high hair, as well as bunches. It will be a great decoration for a wedding dress.

- If you have skills in beadwork, you should try to make a masterpiece yourself using beads. From it you can weave a flower, bow, circle, unusual pattern. The entire structure must be made with fishing line, and at the end securely attached to the base.


For high styling
Ceremonial hairstyles require special decorations, so the usual invisible beams for the beam will not cope here. Hair clips for hair volume bumpits are needed, as well as wedding hair clips for a spectacular hairstyle. If you show imagination, you can create an original hairpin, which no one else will meet.

So, here is an unusual option. Suitable for both bundles and other styling:
- It is necessary to prepare materials: a fabric that can hold a shape, flexible and elastic fishing line, dry glitter, glue, threads and needles, a base for invisibility.
- It is recommended to take a hard standing cloth, otherwise the petals of the invisible will be ugly to lie. Need to cut a few of these petals. Each of them can be processed along the edges so that the fabric does not crumble.
- It is interesting to create pieces of fishing line with sparkles. To do this, each piece must be dipped in glue, and then in dry glitter. It is necessary to lower in sparkles only a fishing line tip. At the ends of the wire should be shiny. It is necessary to cut several such pieces.
- Now the line and the petals must be securely interconnected. For this, pieces of fabric are sewn or glued to the base, and pieces of fishing line are inserted into the middle. This can be done in several ways, but it is better to make a ringlet at each end of the line, which is then easily sewn to the blank.

Additionally, you can use bumpits - a tool for creating volume at the roots. Such product bumpits are a great way to make high styling.
Some useful tips
- A great decoration for invisibility can be crocheted. It should take bright colored threads. From them you can make flowers, bows, ribbons. For example, so can be decorated with a crab barrette for high hair.
- It is not necessary to attach the resulting decoration to the hairpin. You can take the old gum, and they will look unusual and new.
- A hairpin-crab can also be beautiful and unusual. Independently make it difficult. But the crab barrette is a great base for jewelry.
 Old ribbons, beads and everything in the house will come in handy. It should be firmly attached jewelry to the design. This can be decorated with a banana barrette, as well as a Twister hairpin.
 - For a spectacular beam or other hairstyle, you can make bright invisible and unusual hairpins with your own hands. It's simple enough: you need to take the old studs and attach a flower or a bright bead to each. Thus, even the simplest studs will be a spectacular decoration.
 Old ribbons, beads and everything in the house will come in handy. It should be firmly attached jewelry to the design. This can be decorated with a banana barrette, as well as a Twister hairpin.
What can be decorations for hair
How to come up with something unusual and original, so that it would organically blend with the outfit, it would be to face the bride, but it would be comfortable and most beautiful.
 The hair clip of rose flowers is quite original and fits nicely into the image.
Let's start with several variations of hair ornaments that you can do with your own hands.
- Bezel, which can be decorated with beads, rhinestones, stones, beads. It will also look spectacular hoop, decorated with a decorative flower, a large bow or a luxurious brooch.
Bezel do it yourself
- A bead or crystal tiara creates a truly royal look.
- Fresh flowers in hair. It is always romantic, fresh and festive.
- A feather flower adds elegance to the bride.
- Threads of beads or pearls. It would seem a modest decoration, but make the most simple wedding hairstyle.
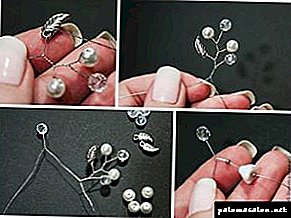
- Decorative sprigs of wire with interwoven stones or beads. The bouquet is very delicate and airy.
- Fabric flowers. A single white silk flower can replace expensive styling.
- A veil of fine lace or mesh adds a little intrigue and mystery to the image.
- A wreath of flowers speaks of the bold, unusual views of its owner.
Wreath on the head with his hands
Such a decoration will not be left without universal attention and delight.
- Tika is an original Indian jewelery in the form of a pendant, which covers the hair parting and crowns the forehead with a beautiful pendant. Tiku can be made from beads, stones or pearls.
- Flower kanzashi. Made from satin ribbons. Painstaking work, petal to petal, small strazik and ready delightful decoration for the wedding.
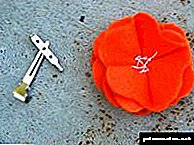
From foamirana

To decorate an old shabby hairpin with foamiran flowers, you will need:
- Foamiran white and green flowers
- harvesting stamens
- pastel blue, blue and purple,
- an old barrette or mount from a barrette,
- scissors and stationery knife,
- wooden skewer
- pencil,
- ruler,
- iron,
- glue gun,
- brush.
First you need to make two stencils for petals and leaves.Draw a rectangle of 2 cm by 2.5 cm on the cardboard and trace the outline of the petal on it, as shown in the photo.


Then draw a square with a side of 4 cm and diagonals that will become guides for the leaf petals. Draw a sheet template in the same way as in the photo. And cut.
Stencils made of cardboard with a wooden skewer circle on the foamiran, petals are on white, and the leaves are green and cut. To create three flowers you will need six flower petals and one leaf blank.

Of course, to create colors you can take foamiran sheets of different shades, but in this master class we offer to paint it yourself in the desired color. For this you need pastel. Take the blue, blue and purple pastels and crumble it with a clerical knife.
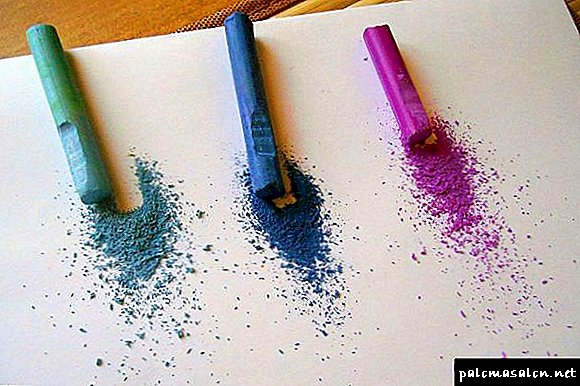
Lightly moistened brush, dip it in pastel and rub it with the petals on both sides. If desired, this can be done with your fingers. The main thing is that before changing the color of the pastels, it is good to wash out the brush and hands.

In addition to the harvested green leaves, you need to cut a few more sheets that will be attached under the flowers and will help close the clip bar. Their shape can be arbitrary, and on the sides you need to make several small cuts.


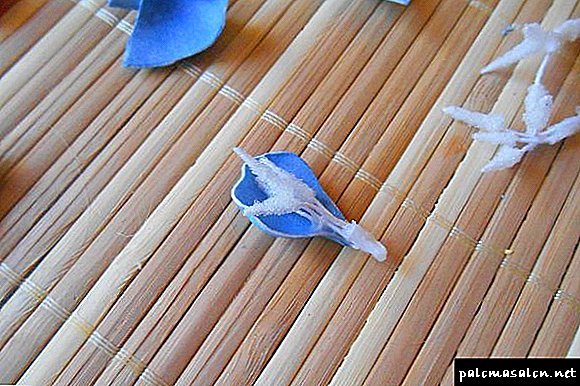
After tinting the petals should be shaped. To do this, heat the iron to medium temperature and alternately apply petals to the iron for a few seconds. Then placing the heated petal on the palm, press on its center with your finger and pull it down a little.
This action will help to make the petals more voluminous, and their edges - embossed.

The green leaves in contact with the iron will also take the desired shape. Additionally, they can be twisted in the palms or rolled into flagella.


For each flower will need two blanks stamens. Fasten them together with a glue gun.

Then gently connect the first petal with the stamens as shown in the photo.
Consistently glue all the petals in a circle so that there are no large gaps between them. Apply glue is necessary strictly on the edge of the petal, then the flower turned out more voluminous. Using this method, collect three flowers.

In order for the leaves to stick tightly to the base of the flowers, the protruding ends of the stamens need to be cut.

Now go to the design of hairpins. First glue all the green leaves on it, carefully hiding the entire surface of the barrette.

Then place the flowers on the barrette, one exactly in the center, the rest on the sides tilted.
From satin ribbons and flowers

To create a delicate elegant hair clip from artificial flowers and ribbons you will need:
- sprig of roses and Ruscus or any small flowers and greens,
To create a base for a hairpin, cut a small strip from the cardboard, bend it in half and add invisibility to it as shown in the photo. Glue the resulting construction with hot glue. 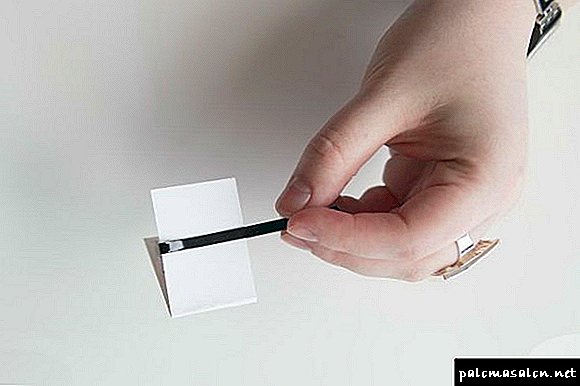
Fold the tape in a loop and fix with glue. Next, form a second loop from the ribbon and secure it with glue over the first one by sliding it slightly obliquely. Then continue to fold the loops in a similar way until you have a full circle. Cut off the rest of the tape.
Glue the resulting bow to a cardboard base with stealth. 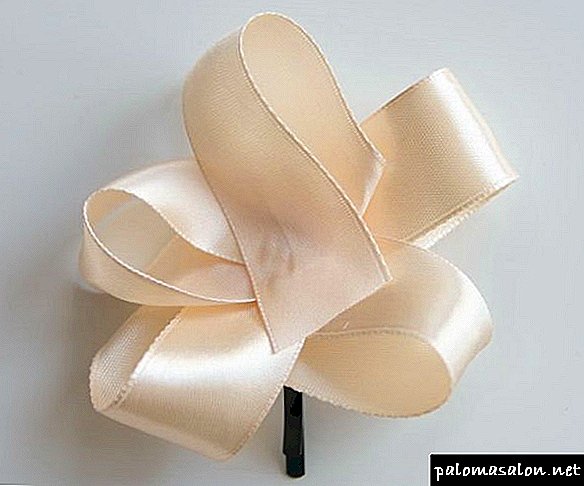
Using the pruning shears, cut the stems right under the head of the flower, and divide the greens into separate leaves. First try on how to place the flowers on the base, and then, abundantly applying glue to the base of each element, begin to attach flowers and leaves to the hair pin. 
Polymer clay

To create a set of stylish autumn ornaments made of polymer clay, you must take:
- polymer clay of red, orange, yellow, dark yellow colors,
- stencil for polymer clay,
- brown beads,
- fishing line 3 mm
- chain and clasp for bracelet,
- crocodile hair clips - 2 pieces,
- Super glue,
- brush,
- scissors,
- toothpick
- acrylic lacquer.
The set will consist of a bracelet and two hairpins, decorated with bunches of mountain ash and bright autumn leaves.
Therefore, to begin to make berries of mountain ash. Take a small piece of red polymer clay and divide it into several equal parts.
Mash the clay in your hands to make it plastic and roll it into a ball. 
Using a toothpick, pierce the future berry through to create mounting holes. At the entrance of the resulting hole, using light pressure with a toothpick, make small groove characteristic of rowan. For decorations you need about 50 of these berries.
For the manufacture of autumn leaves, take a little clay of each color. 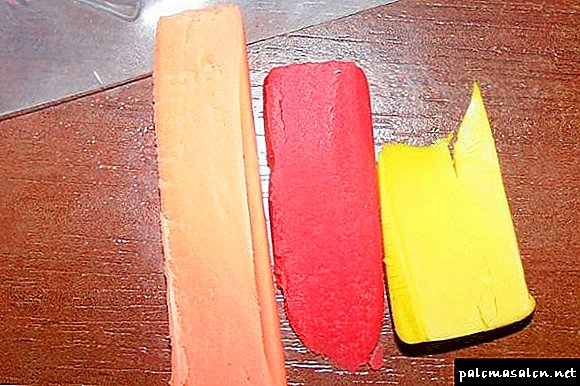
Mash it well and mix together. 
Cut the required amount of clay for one sheet and firmly fill it with a special stencil. If you do not have such a stencil, roll a piece of clay and give it a form of a sheet yourself. To create an invoice, you can use a live or artificial sheet, attaching it to the blank to print the veins. 
Remove the sheet from the stencil should be very careful, as it is quite thin and can be deformed or torn.
Make several sheets of different shapes and sizes. At the base of each workpiece with a toothpick, make through holes for mounting.
Next, put all the prepared items in the baking dish and send it to the oven for baking for 15-30 minutes at a temperature not higher than 130 degrees. 
When the specified time is out, take the items out of the oven, let them cool and cover with several layers of acrylic lacquer. At this stage, the blanks will gain strength and brilliance. 
Now we proceed to the assembly of the bracelet and pins. For the bracelet, take the chain to the size of the hand and attach the lock to the extreme links.

Begin to collect decoration items according to the diagram below.

Type six beads on the line, then a rowan berry and another bead, and return the same edge of the line back the same way. Tighten the line, you got the first twig. Similarly, weave the remaining six branches and connect them with leaves.

Unclench the link of the bracelet and put the first decoration on it.

Then make another 4-5 similar jewelry and attach them to the bracelet.
Now, using superglue, glue the largest leaves to the hairpins, and on top of the sheet, attach a bunch of berries, collected according to the scheme attached above. Just pay attention, we increased the number of twigs with berries.

In conclusion, add hairpins with the remaining small leaves.

From tapes gro-gro
These hairpins were popular in the days of disco. To make such a retrozakolku need:
- metal oblong hairpins with a length of not less than 5 cm,
- gro-gro tape up to 4 mm wide,
- gun-glue (with hot glue).
Cut approximately 60-65 cm of ribbon. Fold in half. Attach the center of the ribbon to the base of the barrette, then stretch one of the edges through the middle, repeat the same with the second end.

Do this alternation to the end of the barrette, wrapping it with a ribbon.

Reaching the end, tie a knot.
The tail of the tape must be twisted into a tight bundle.

Apply a drop of glue to the base of the barrette, wind the remnants of the tape-bundle, forming a dense flower.
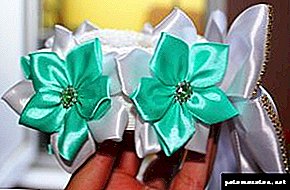
In kanzashi technique
To decorate a bow hairpin using the kanzashi technique, prepare:
- satin ribbon 5 cm wide,
- a candle or a lighter,
- scissors,
- tweezers,
- Super glue,
- rhinestones and beads,
- a piece of felt
- a hairpin,
- feathers.
For a start, cut 14 squares with a side of 5 centimeters out of a ribbon. This number of petals is enough to form a single flower.

Each square bend diagonally.

The resulting triangle again bend in half.

And once again in half.
Make sure that the folds on each petal are performed in the same direction. The irregular corner of the product should be cut a little, and then sing it over the flame of the candle and squeeze with tweezers so that all layers of the tape are connected.

Cut off the back of the resulting petal at an angle of 25 degrees as shown in the photo. And singe too.

It should be such a petal:

During work, be sure to try to scorch all the tape cuts so that it does not crumble. Otherwise, the product will quickly lose its appearance.
To the seven petals paste the beads as in the photo. 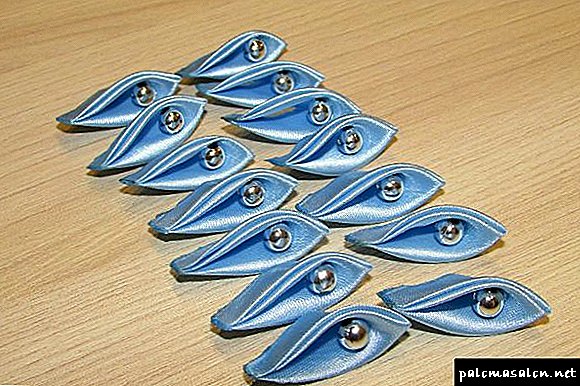 These petals will be located in the first row of the flower.
From a piece of felt cut a circle with a diameter of 4 centimeters. On this basis a flower will be collected.

Now in a circle we apply feathers to the felt base and fix them with glue. Pre-feathers should be sorted by size and shape, if necessary, cut or straighten.

Glue the seven petals with beads over the feathers in a circle. For greater reliability, first, the petals can be strung on a thread and pulled together in the shape of a flower, and the top can be pasted.

Mount the second row of petals in the gaps between the petals of the first row.
Decorate the center of the flower with rhinestones, and glue the clip on the reverse side to the felt.
Acrylic Coated
For such hairpins you need:
- set of metal hairpins,
- fine brushes,
- acrylic paints,
- cardboard cut,
- art varnish.
To begin with, fasten the hairpins on the cardboard. So it will be more convenient to decorate them.
Squeeze the required amount of acrylic paints onto the palette.
Apply the first layer, let it dry and then slightly slide the pins on a clean cardboard.

Make the second layer more saturated. Let dry.
The final layer will be coated with clear varnish.
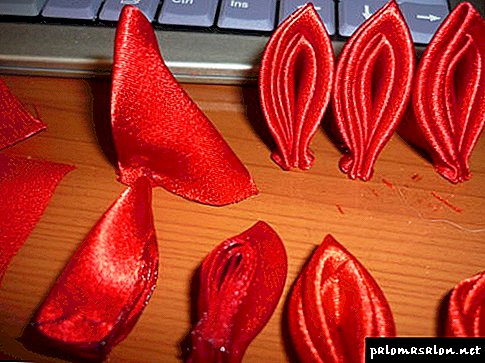
Making petals in retro style
"Kanzashi" are considered flowers that have sharp petals.

In the manufacture of large petals (corolla peony), the girl performs the following actions:
The result is a voluminous round petal.
The girl makes several large petals - in different rows. In the middle of a flower like this, a girl inserts a pearl bead that blends well with the delicate form of the petals.
Also, when decorating a flower, a woman enjoys stamens. In such a situation, the girl performs the following actions: cuts a piece of string or fishing line,

Also a woman makes a stamen like this:
Making hairpins in the form of a bow for children and adults
When self-manufacturing hairpin-bow girl performs the following actions:
 The hairpin on hair looks great if it is in place.
As a result, a girl can make a beautiful hairpin at home - this is an easy process. In this situation, the woman transforms her hairstyle and appearance in general.
Materials and tools
Before you make hairpins from hair, you need to prepare these materials and tools:
- artificial hair,
- BF-6 glue,
- stiff bristle brush
- alcohol (for degreasing cans, washing the brush),
- comb,
- glass jars, glasses, wine glasses,
- additional elements for decor.
Tip!
If during operation the glue starts to dry out a little, you can add a little alcohol to it.
Wooden hairpins
Wooden hairpins are original and unique accessories that will give your look naturalness and natural charm. The most convenient is pear veneer, which can be purchased off-the-shelf, both in the store and made on your own. The price of a finished pear veneer is substantially less than the cost of a noble wood veneer, besides, this material is amenable to simple processing when creating jewelery.

Instructions for creating hairpins from veneer:
- Cut a few strips of veneer 1 mm thick from a wooden block with a plane.
- Using scissors cut narrow strips from the cut veneer into the shape of the barrette.
- On the one hand, grease each of the strips with PVA glue and put them together.
- Place glued veneer on a cylindrical shape and slightly bend it.
- To fix the shape and make the structure rigid, for the time of gluing the veneer the barrette must be covered with a metal tin band, secure with an elastic band and allow time for drying.
- Using scissors, trim the extra pieces of veneer and round the corners.
- As a stud, you can use ready-made bamboo sticks, at the ends of which two holes are drilled.
- You can decorate the product using a burning technique and cover it with a varnish coat.
Improvised jewelery
From improvised means you can also make beautiful and unusual hair ornaments.

Feather decoration

Button and feather decoration

Polymer clay jewelery
Jewelry made in-house will always look stylish, original and elegant, as well as branded hairpins purchased from specialized accessories stores. From the attached video in this article, you can learn about the techniques of making pins from a variety of materials. Successes!
DIY hair jewelry
Beautiful and well-groomed hair at all times were considered the pride of a woman. Hair ornaments that you can make yourself will help you to decorate your hair and make your hairstyle more expressive. To do this, you need to decide what you want: a hairpin, bezel, rubber band or comb. And for what event you need hair ornaments, for festive styling, or for everyday hairstyles. Handmade jewelry always looks original and gives a certain charm to your style. Exclusive handmade hair accessories are now highly valued, always in demand and extremely popular.
Hair accessories made from wire and beads with your own hands


Video master class how to make a wreath on the head of wire and beads with your own hands
How to make a comb from jewelry wire with your own hands a master class
Hair accessories from ribbons do it yourself
Hair ornaments made of ribbons are increasingly used to create hairstyles. Ribbons, a versatile material for jewelry, you can make beautiful volumetric flowers out of them, ribbons can be fixed on the rim, as well as exclusive hair clips and hairpins.


Gum from tapes with their own hands master - class